
Install the snippet
Add the Attribution JavaScript snippet to your site and call page(), identify() and track()
To install Attribution you add its tracking code to your website, app or server. The code sends Attribution a message on the triggers you define: a page view, a sign-up, an order.
In the simplest implementation the code is a snippet of JavaScript that you paste into the HTML of your site to track page views. If your site already runs on Segment, Shopify or another supported platform, Bring your own data lists the ways to install without touching your pages.
This tutorial takes you through a basic client-side install of Attribution.
Before you start
First, consider your funnel or ad pipeline. It typically begins with an ad click, then a landing page, then a conversion event. For example:
- A visitor clicks an ad that points to
www.example.com/?utm_source=test. On arrival,page()records the destination URL with its UTM parameters and the referrer. - The visitor submits a web form with their details. That is
identify(), which gives the visitor traits, plustrack(), which records the conversion event for the model.
The snippet you paste into your pages loads attribution.js, the browser library. It does the collecting: it records each page view with its referring domain and destination URL, and it sends the identify() and track() calls you make. The Attribution platform does the rest: it sorts those visits into channels and filters, runs the attribution model and distributes credit on the dashboard. Below you will learn what attribution.js collects and the three calls that make up an install.
Install the snippet and call page() to start tracking visits
page() to start tracking visitsLog in and open Settings → Setup Instructions. The page shows your Attribution Project ID at the top and, below it, the JavaScript snippet with that ID already filled in. Copy the snippet.
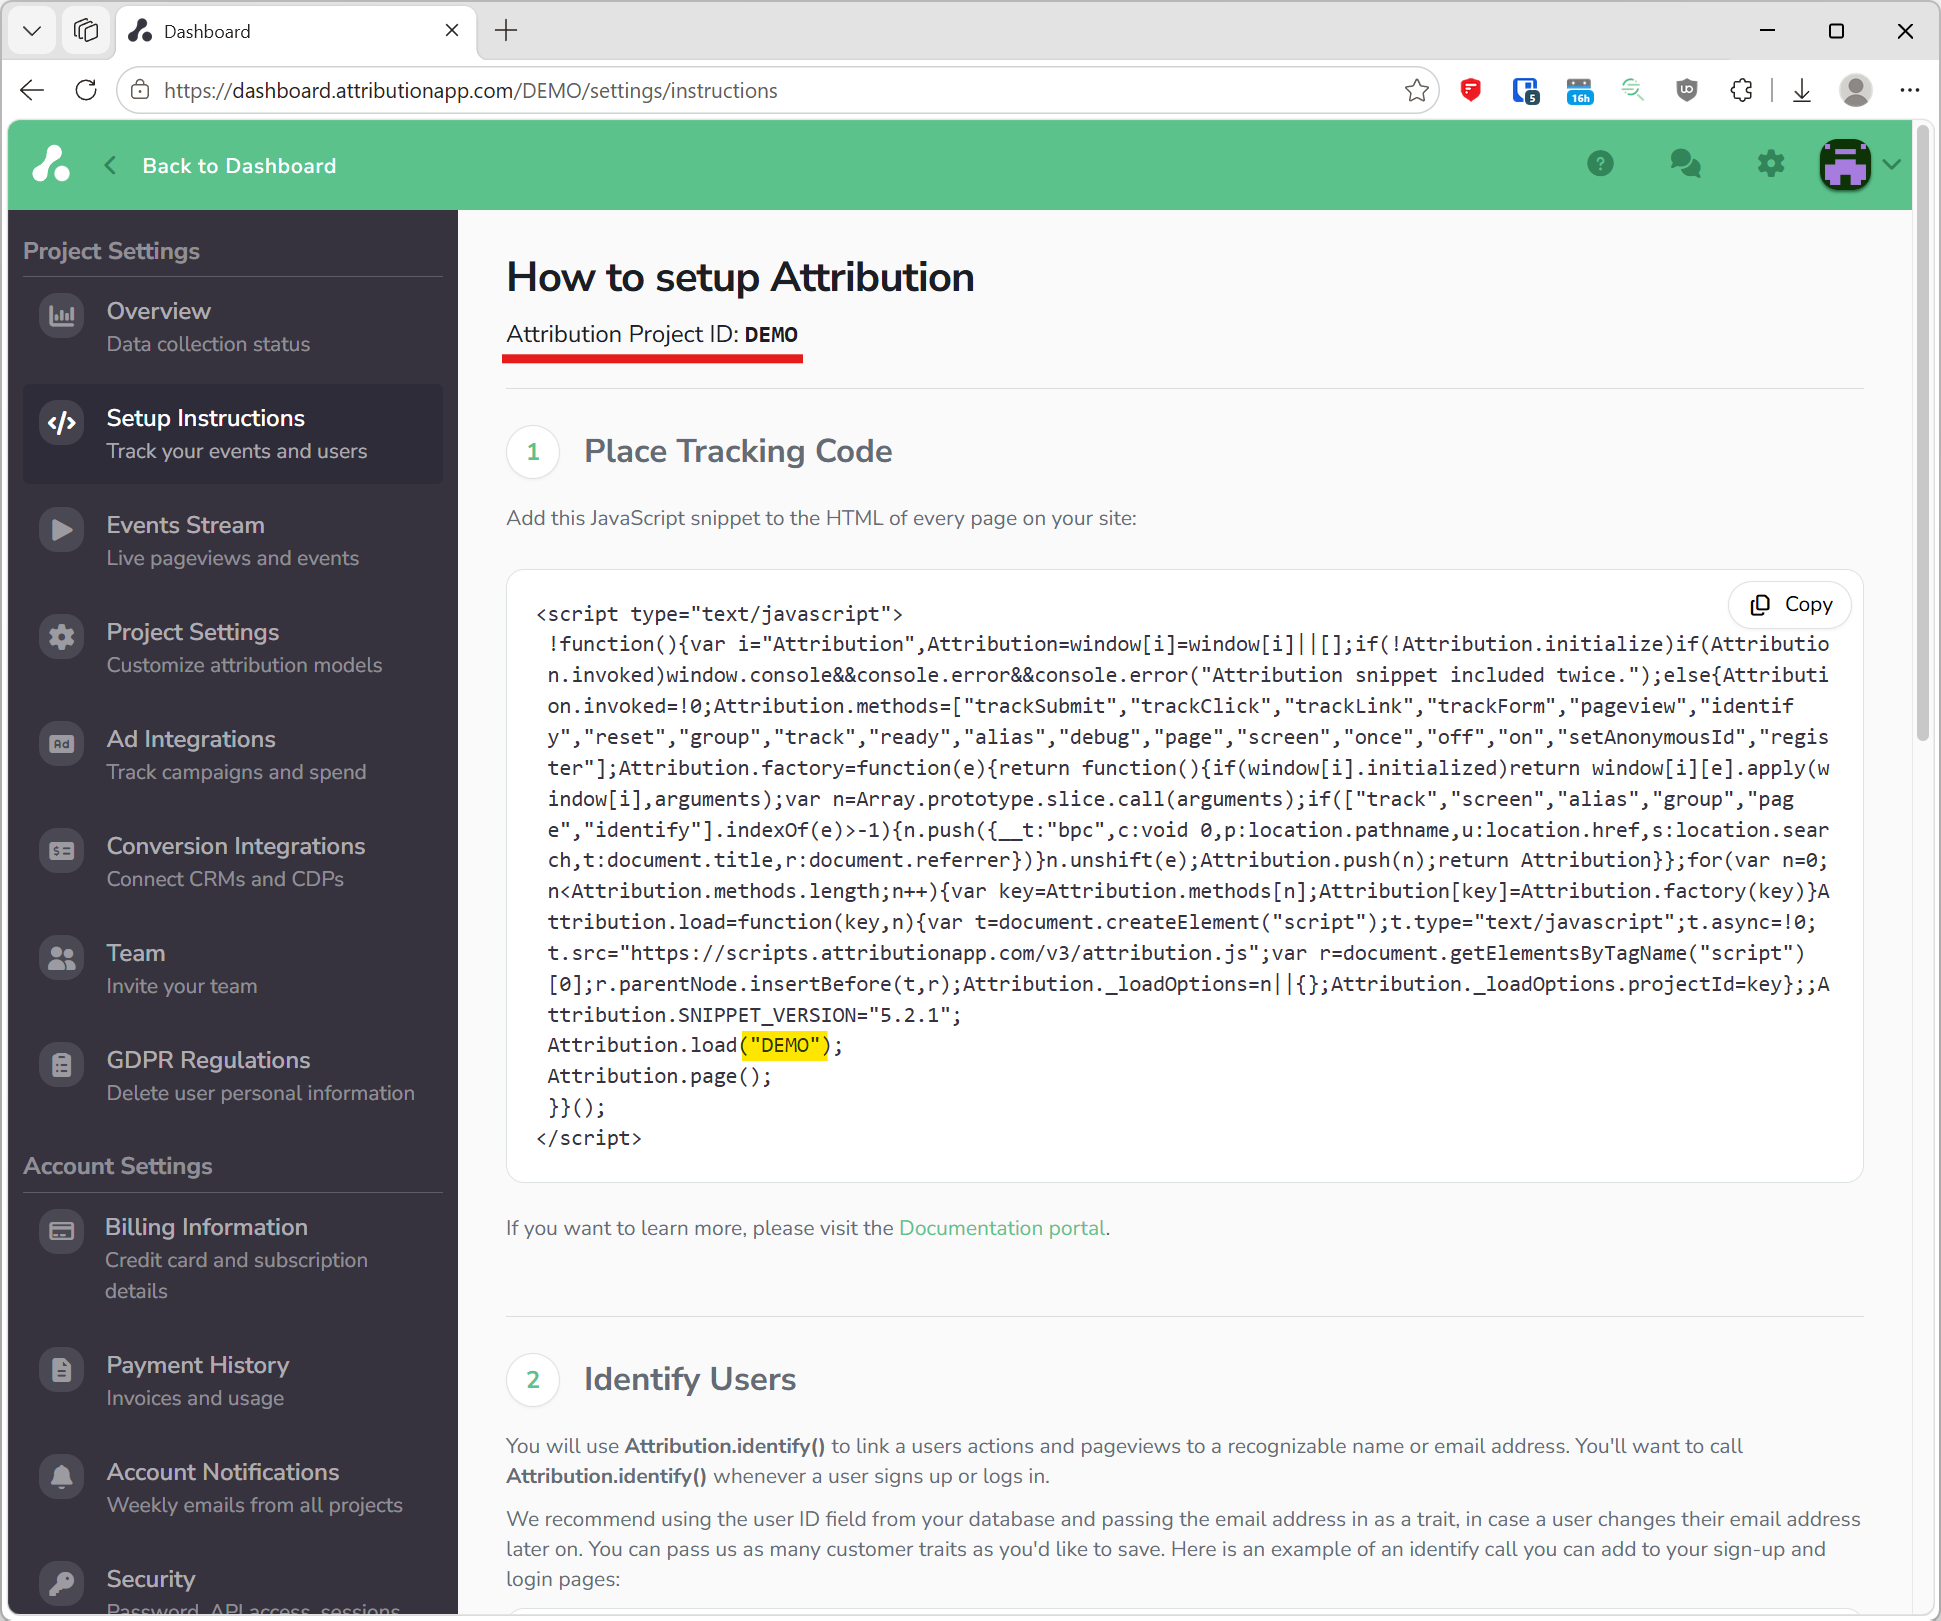
Paste the snippet into the <head> of every page. This assumes all your pages share one domain; to track several domains as one project, add the cross-domain snippet as well.
Bundling or Minifying Attribution codeDo not minify the Attribution snippet or bundle it with webpack or a similar tool; it may become unstable. Avoid wrapping the snippet in a JavaScript closure. You are free to call
track()oridentify()from inside your web app.
The snippet loads attribution.js asynchronously, so it does not affect your page load speed. Once it runs on your site, page views are sent to Attribution and visits start being recorded, each with its time, referring domain and destination URL.
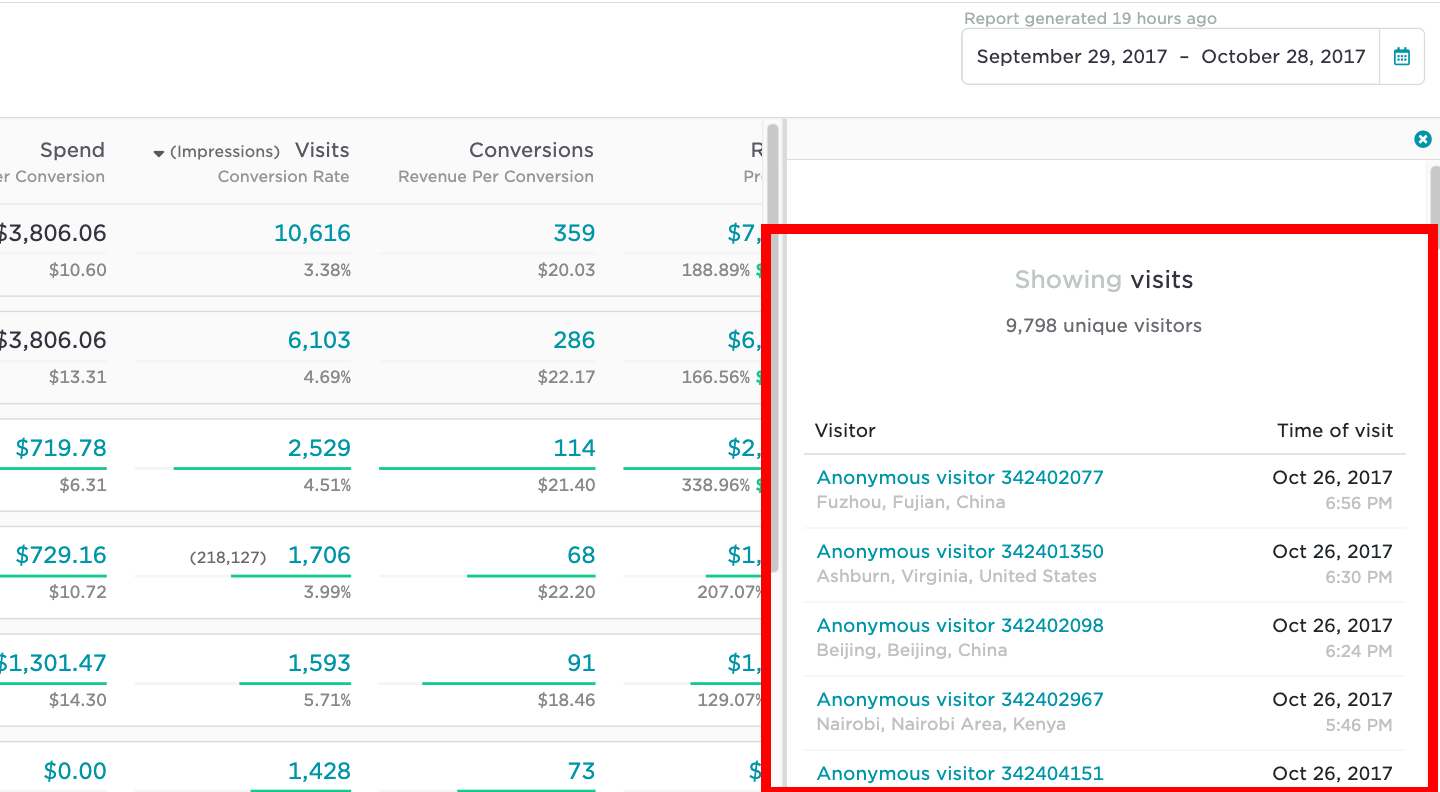
For example, the referring domain may be www.google.com and the destination URL www.example.com/?utm_source=test. attribution.js only collects these values; the Attribution platform uses them to filter visits on the dashboard and credit ads.
Visitors appear with anonymous visitor IDs in the sidebar when you drill into any blue number on the dashboard. Continue reading to learn how to give your visitors traits.
Call identify() for Attribution to know your users
identify() for Attribution to know your usersThe identify() method is how you tell Attribution who the current user is. It includes a unique User ID, and any optional traits you know about them. Calling identify() is not a requirement for installing Attribution, but it is highly recommended. It lets you assign a User ID, name and email to your visitors, and it unlocks company-based attribution and the conversion integrations that match on email.
You do not need to call identify for anonymous visitors. Attribution assigns them an anonymousId, so page() and track() work without it. Call identify whenever you capture personal information about the visitor; it also lets Attribution follow a visitor across devices.
Identifying with
If visitors are not identified before they enter your CRM or conversion tool, the events those integrations send will likely land in Unknown Source.
Here is what a basic call to identify looks like:
Attribution.identify('u_8841', {
  name: 'Marcus Aurelius',
  email: '[email protected]'
});
That identifies Marcus by his unique User ID, u_8841, which is what you know him by in your database, and labels him with name and email traits.
If you have no user database, omit the user ID and the email trait serves as the identifier.
Attribution.identify({
  name: 'Marcus Aurelius',
  email: '[email protected]'
});
Please be sure to replace those hard-coded trait values with the variables that represent the details of the currently logged-in user!
To do that, we recommend using a backend template to inject an identify call after the Attribution snippet, in the footer for example, on every page where the user is logged in. That way, whatever page the user lands on first, they are identified.
Depending on your templating language, the call might look like this:
Attribution.identify('{USER.ID}', {
  name: '{USER.FULLNAME}',
  email: '{USER.EMAIL}'
});
With that call in your page footer, you successfully identify every user that visits your site.
Remember: do not call identify() if you do not know who the visitor is, that is when neither a User ID nor an email is available.
The identify() reference has the full list of options.
Identifying without personal data
identify() works with a user id alone, a GUID or your own account id, and no other traits; page views and events carry no personal data in any case. Without the email trait, conversion integrations cannot match their records to visits.
Common scenarios when identify() is recommended to be called
identify() is recommended to be called- A user signs up on your website: identify with User ID and email, and track a "Signed Up" event.
- A user logs into your website or app: identify with User ID and email.
- A marketing form is submitted: identify with email, and track a "Form Submitted" event.
- A user clicks a marketing email and lands on a page: identify if the email is available.
- A user subscribes to marketing emails: identify with email, and track a "Subscribed to Newsletter" event.
Call track() to record events and build your model
track() to record events and build your modelThe track method gives Attribution a conversion event to measure return against. Record pipeline events such as "Trial Started" or "Demo Requested" to measure your ads against specific points of the funnel, and revenue events such as "Order Paid" or "Subscription Payment" to bring revenue into your model.
Here is what a call to track looks like when a user starts a trial:
Attribution.track('Trial Started', {
  plan: 'Blue'
});
That tells Attribution the visitor triggered the Trial Started event and chose the hypothetical Blue plan.
In Attribution you can filter conversion events by these properties. For example, you can see return on ad spend for your Meta ads on users whose Trial Started event was for the Blue plan.
Conversion events with revenue are special. Whenever a revenue property is present in a track() event, it counts as revenue in calculations and models.
In the example below the revenue of 21.99 is used to calculate return on ad spend on your dashboard.
Attribution.track('Order Complete', {
  revenue: 21.99,
  type: 'blue'
});
To deduct revenue for a refund or return, call track with a negative revenue, for example -21.99. Send revenue as a plain decimal number with a dot as the decimal separator; cents may be omitted.
To get started, we recommend that you track just a few important events. You can always add more later!
Once page(), identify() and track() are in place, the install is complete. The next steps are testing it, connecting your ad platforms and filtering visits.
Recapping the install & connecting the dots
The diagram below shows each step a visitor takes, the method to call, and what appears on the Attribution dashboard when it is called correctly.
flowchart LR
  subgraph Visitor
    B[Lands on the page from an ad]
    C[Submits the form]
    D[Pays for an order]
  end
  subgraph Calls["Your site calls"]
    P["page()"]
    TI["identify() + track('Form Submitted')"]
    TR["track('Order Paid', { revenue })"]
  end
  subgraph Dash["Dashboard shows"]
    V[A visit with referrer and UTM parameters]
    U[A known user with a conversion event]
    R[Revenue on that conversion, credited to the ad]
  end
  B --> P --> V
  C --> TI --> U
  D --> TR --> R
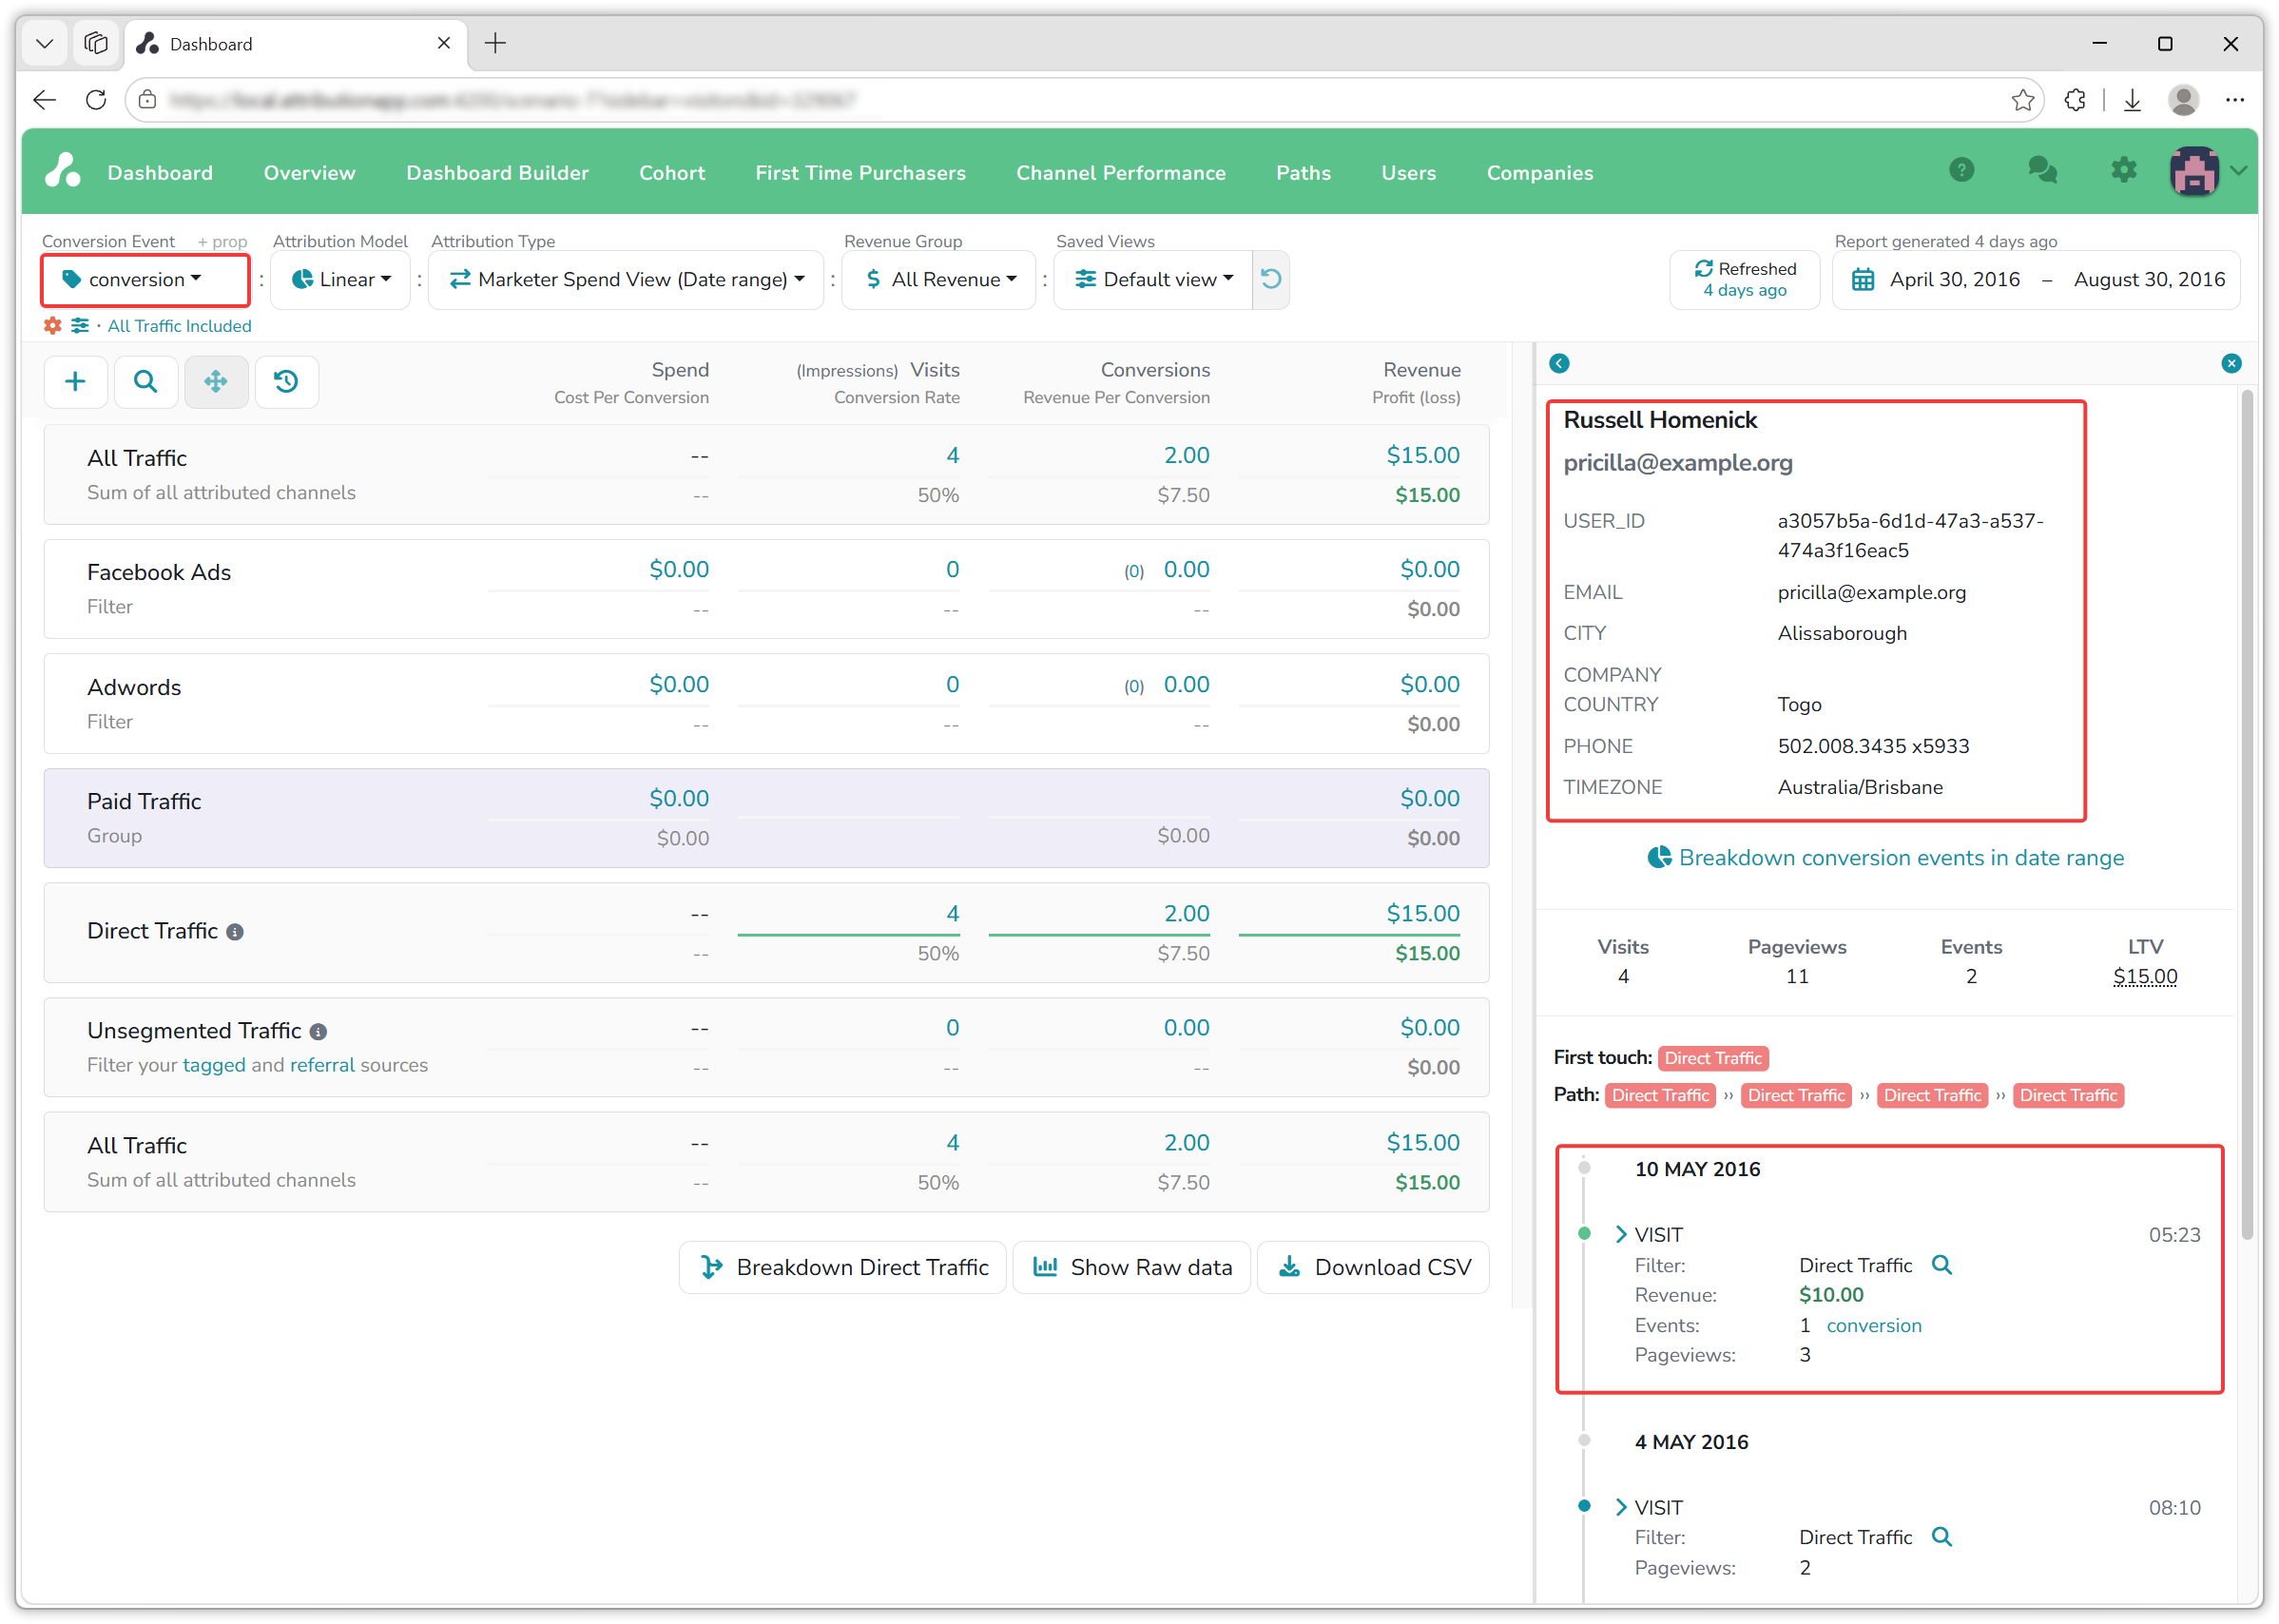
And here is where the three calls surface on the dashboard itself:
track()fills the Conversion Event selector at the top left. Every event name you track is offered there, and the dashboard measures return against the one you pick; here it isconversion.identify()fills the visitor panel in the right sidebar: the User ID and the traits you sent, such as name, email, city and phone.page()creates the visits in the visitor's timeline below it. Each visit shows the filter it was credited to, Direct Traffic in this case, the pageviews it contained, and the events tracked during it, with their revenue.
If you have any questions please reach out to [email protected]
Updated 15 days ago